---
title: How to Assign a Device in the EVERYWHERE Hub
description: Assign a device in the EVERYWHERE Hub with a user alias and email to support app activation, registration, and streamlined device management.
---
[Skip to content](https://info.everywherecomms.com/knowledge/device-assignment#main-content)
[](https://info.everywherecomms.com/knowledge/?hsLang=en)
- Quick Start
Show submenu for Quick Start
- [Transferred Device Setup Tutorial](https://support.everywherecomms.com/showcase/cme7gei8t01cpwv0its994lps?utm_source=cp-menu)
- [New Device App Setup Tutorial](https://support.everywherecomms.com/showcase/cmem2r4r501io1j0hoe2lf2gk?utm_source=cp-menu)
- [Bluetooth Pairing Tutorial](https://everywherecomms.com/pages/bluetooth-pairing-everywhere-app)
- Resources
Show submenu for Resources
- [Learning Tour](https://support.everywherecomms.com/demo/cmdnhq1sy078a9f96oxjfxl89?utm_source=cpmenu)
- [How-to Videos](https://www.youtube.com/playlist?list=PLEPJrMjMTsUrX5PVx6CzSoXqFiSeYqRwv)
- [Status Page](https://everywherecomms1.statuspage.io/)
Open main navigation
Close main navigation
- Quick Start
Show submenu for Quick Start
- [Transferred Device Setup Tutorial](https://support.everywherecomms.com/showcase/cme7gei8t01cpwv0its994lps?utm_source=cp-menu)
- [New Device App Setup Tutorial](https://support.everywherecomms.com/showcase/cmem2r4r501io1j0hoe2lf2gk?utm_source=cp-menu)
- [Bluetooth Pairing Tutorial](https://everywherecomms.com/pages/bluetooth-pairing-everywhere-app)
- Resources
Show submenu for Resources
- [Learning Tour](https://support.everywherecomms.com/demo/cmdnhq1sy078a9f96oxjfxl89?utm_source=cpmenu)
- [How-to Videos](https://www.youtube.com/playlist?list=PLEPJrMjMTsUrX5PVx6CzSoXqFiSeYqRwv)
- [Status Page](https://everywherecomms1.statuspage.io/)
- [Contact Support](https://www.everywherecomms.com/contact-support.html)
[Contact Support](https://www.everywherecomms.com/contact-support.html)
The EVERYWHERE Knowledge Base – support for onboarding, training, and support.
- There are no suggestions because the search field is empty.
1. [EVERYWHERE Knowledge Base](https://info.everywherecomms.com/knowledge?hsLang=en)
2. [Hub for Admins](https://info.everywherecomms.com/knowledge/hub-for-admins?hsLang=en)
3. [Device Management](https://info.everywherecomms.com/knowledge/hub-for-admins?hsLang=en#device-management)
# How to Assign a Device in the EVERYWHERE Hub
## There are two ways to assign devices in the EVERYWHERE Hub. You can give the user their config key or QR code so they can activate the app on their own, or you can assign the device directly to their email address from the Hub. This article covers both methods, plus how to rename a device so it shows up clearly in your fleet.
### Before You Start
Make sure:
- You have access to the [**Everywhere Hub**](http://everywhere-hub.com)
- You have permission to **manage devices.** If you don't see the device in question reach out to *support@everywherecomms.com* to adjust permissions.
- The device is active and assigned to your account
---
### **Option 1: Share a config key or QR code**
### What is a config key?
Every device in the EVERYWHERE platform has a configuration key, or "config key." It is a unique alphanumeric code that links a physical Garmin device to your organization's account in the EVERYWHERE Hub. When a field user enters this key (or scans the QR code version of it) during app setup, the app connects to your account and the device becomes active.
Think of the config key as the device's credential. Without it, the app cannot pair to your account.
### What does it mean to "release" a config key?
Releasing a config key disconnects the current user from the device so the key can be reused. You would do this when a device is changing hands — a team member leaves, a device gets reassigned, or you need to clear a stuck activation. Once released, the config key is free to be entered by the next user.
For step-by-step instructions, see: [How to Release & Retrieve Configuration Keys in the EVERYWHERE Hub](https://info.everywherecomms.com/knowledge/release-key-hub?hsLang=en).
### How to access the config key and QR code
1. Log in to [www.everywhere-hub.com](http://www.everywhere-hub.com/).
2. Select **Devices** from the main menu.
3. Click the name of the device you want to share.
4. On the device details page, locate the config key. It will appear as a short alphanumeric code. The QR code version is displayed directly alongside it.
### How to share the QR code
The QR code is a great option when users are picking up a shared device and just need to scan and go. Here is the quickest way to share it:
1. Open the device details page where the QR code is visible.
2. Take a screenshot of the QR code on your screen.
- **Windows:** Press `Windows key + Shift + S` to open the Snipping Tool, then drag to select the QR code area.
- **Mac:** Press `Command + Shift + 4`, then drag to capture just the QR code.
- **Mobile (iOS/Android):** Use your standard screenshot shortcut, then crop to the QR code.
3. Send the screenshot to the field user by email, text, or your team's messaging platform.
4. The user opens the EVERYWHERE app, selects **Set Up Device**, and scans the code when prompted.
**Tip for shared devices:** The QR code method works especially well for teams that rotate devices between shifts or share gear across locations. Each user scans in, and admins can track who has what from the Hub.
---
### **Option 2: Assign a device by email from the Hub**
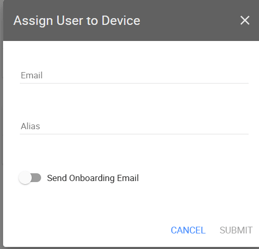
Use this method when you want to assign a device directly to a specific person. Entering their email here connects their account to the device and supports the registration process in the EVERYWHERE app.
### Before you start
- You have access to the [EVERYWHERE Hub](http://everywhere-hub.com/).
- You have permission to manage devices. If the device does not appear, contact [support@everywherecomms.com](mailto:support@everywherecomms.com) to check your permissions.
- The device is active and assigned to your account.
### Step 1: Log in to the EVERYWHERE Hub
Go to [www.everywhere-hub.com](http://www.everywhere-hub.com/) and sign in with your username and password.
### Step 2: Open the Devices page
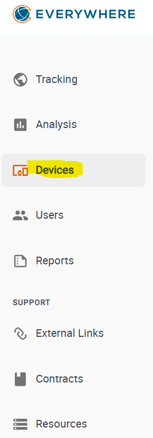
From the main menu, select **Devices**.
### Step 3: Select the device
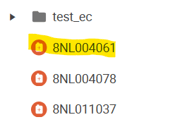
Find the device you want to update and click the device name to open its details page.
### Step 4: Open device settings
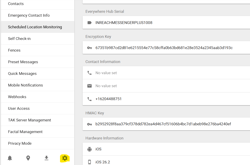
On the device details page, scroll down to the **Settings** section.
### Step 5: Enter the email address
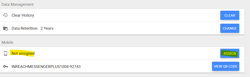
Click **Assign** and type in the email address for the person you are assigning the device to. Double-check for typos before continuing.
### Step 6: Save your changes
Click **Save** to apply the assignment.
---
### **Rename a device using the alias**
By default, devices appear in the Hub with their Garmin serial number or a generic name. That works fine with a handful of devices, but it gets hard to manage when you have a full fleet. The alias field lets you give each device a plain-language name so your team can identify it at a glance.
Common examples: *Unit 4 – North Team*, *Field Supervisor – Site B*, or simply a person's name.
### How to update the device alias
1. Log in to [www.everywhere-hub.com](http://www.everywhere-hub.com/).
2. Select **Devices** from the main menu.
3. Click the device name to open the device details page.
4. Scroll to **Settings** and locate the **Alias** field.
5. Click into the alias field and type the new name for the device.
6. Click **Save**. The updated name will display in the Hub immediately.
**Note:** The alias is only visible in the Hub. It does not change anything on the physical Garmin device.
- [Getting Started](https://info.everywherecomms.com/knowledge/getting-started?hsLang=en#main-content)
- [Welcome to EVERYWHERE](https://info.everywherecomms.com/knowledge/getting-started?hsLang=en#welcome-to-everywhere)
- [Device Activation](https://info.everywherecomms.com/knowledge/getting-started?hsLang=en#device-activation)
- [Connectivity & Pairing](https://info.everywherecomms.com/knowledge/getting-started?hsLang=en#connectivity-pairing)
- [First-Time Admin Setup](https://info.everywherecomms.com/knowledge/getting-started?hsLang=en#first-time-admin-setup)
- [Field Devices & App](https://info.everywherecomms.com/knowledge/field-devices-app?hsLang=en#main-content)
- [Messaging](https://info.everywherecomms.com/knowledge/field-devices-app?hsLang=en#messaging)
- [Notifications & Alerts](https://info.everywherecomms.com/knowledge/field-devices-app?hsLang=en#notifications-alerts)
- [Tracking & Location](https://info.everywherecomms.com/knowledge/field-devices-app?hsLang=en#tracking-location)
- [SOS Basics (User View)](https://info.everywherecomms.com/knowledge/field-devices-app?hsLang=en#sos-basics-user-view)
- [Device Guides](https://info.everywherecomms.com/knowledge/field-devices-app?hsLang=en#device-guides)
- [Check-ins](https://info.everywherecomms.com/knowledge/field-devices-app?hsLang=en#check-ins)
- [Hub for Admins](https://info.everywherecomms.com/knowledge/hub-for-admins?hsLang=en#main-content)
- [Device Management](https://info.everywherecomms.com/knowledge/hub-for-admins?hsLang=en#device-management)
- [Alerts & Notifications](https://info.everywherecomms.com/knowledge/hub-for-admins?hsLang=en#alerts-notifications)
- [Tracking & Location](https://info.everywherecomms.com/knowledge/hub-for-admins?hsLang=en#tracking-location)
- [Reports & Analytics](https://info.everywherecomms.com/knowledge/hub-for-admins?hsLang=en#reports-analytics)
- [Features](https://info.everywherecomms.com/knowledge/hub-for-admins?hsLang=en#features)
- [User & Device Management](https://info.everywherecomms.com/knowledge/hub-for-admins?hsLang=en#user-device-management)
- [SOS & Safety](https://info.everywherecomms.com/knowledge/sos-safety?hsLang=en#main-content)
- [Initiating SOS](https://info.everywherecomms.com/knowledge/sos-safety?hsLang=en#initiating-sos)
- [Cancelling SOS](https://info.everywherecomms.com/knowledge/sos-safety?hsLang=en#cancelling-sos)
- [SOS Escalation Flow](https://info.everywherecomms.com/knowledge/sos-safety?hsLang=en#sos-escalation-flow)
- [Testing SOS & Signal](https://info.everywherecomms.com/knowledge/sos-safety?hsLang=en#testing-sos-signal)
- [Safety Best Practices](https://info.everywherecomms.com/knowledge/sos-safety?hsLang=en#safety-best-practices)
- [Knowledge & Resources](https://info.everywherecomms.com/knowledge/knowledge-resources?hsLang=en#main-content)
- [FAQs](https://info.everywherecomms.com/knowledge/knowledge-resources?hsLang=en#faqs)
- [Quick Help](https://info.everywherecomms.com/knowledge/knowledge-resources?hsLang=en#quick-help)
- [Integrations](https://info.everywherecomms.com/knowledge/knowledge-resources?hsLang=en#integrations)
- [Billing](https://info.everywherecomms.com/knowledge/knowledge-resources?hsLang=en#billing)
- [Announcements & Updates](https://info.everywherecomms.com/knowledge/knowledge-resources?hsLang=en#announcements-updates)
[](https://everywherecomms.com/)
Copyright © 2026, EVERYWHERE Communications