What is the Check-in Dashboard?
The Check-in Dashboard is a page in the Everywhere Hub that helps you monitor scheduled and self check-ins for your team. It gives you a quick view of who has responded, who is late, and who needs attention. This dashboard is designed for real-time operational awareness, not long-term reporting.
How to Access the Check-in Dashboard
- Log in to the Everywhere Hub.
- From the Navigation Bar, click Check-in.
Dashboard Overview
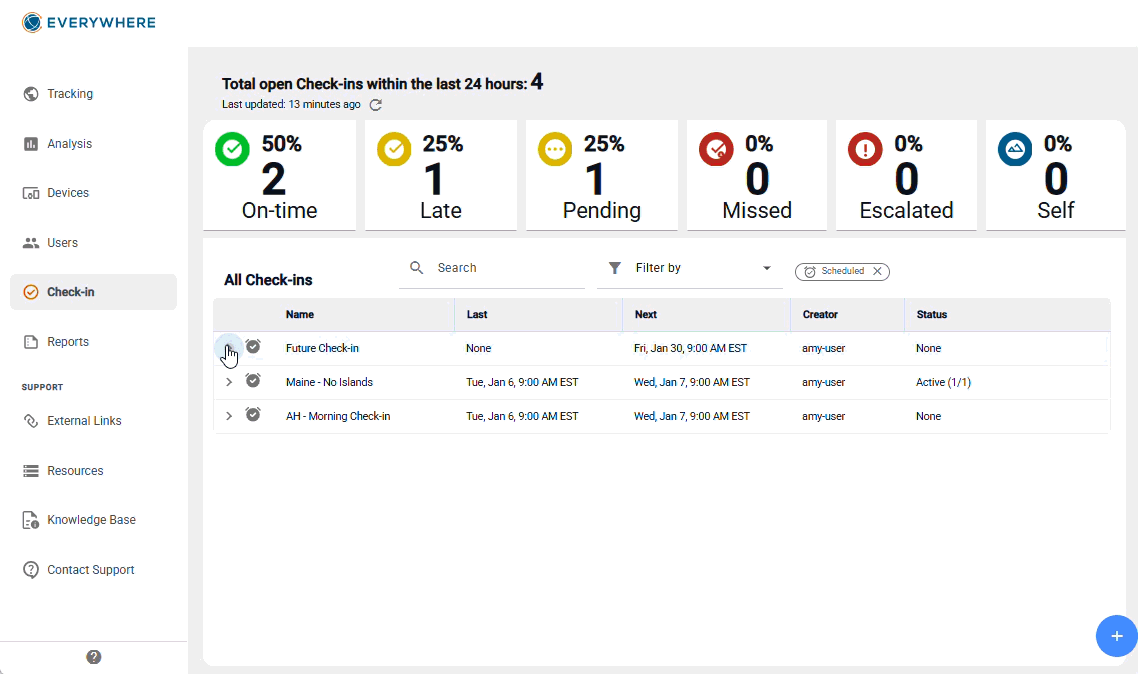
1. Check-in Summary Tiles
Along the top of the dashboard, you’ll see six tiles that summarize your check-ins by status for the last 24 hours. Each tile shows the current count for that status. Closed check-ins are excluded from these totals.

Check-in Statuses
- On-time - Device check-ins that were answered on time
- Late - Device check-ins that responded to a check-in that was missed or escalated
- Pending - Device check-ins that are unanswered
- Missed - Device check-ins that are unanswered in the missed state
- Escalated - Device check-ins that are unanswered and in the escalated state
Other Check-ins
- Self - Number of devices that created a self check-in & with self check-ins enabled
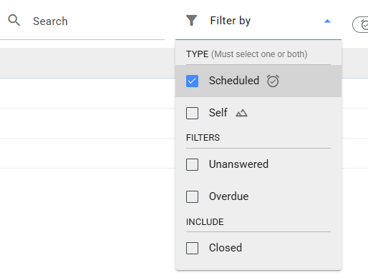
2. Search & Filters
The Check-in Dashboard can show a lot of information—so Search and Filters help you quickly narrow it down to the check-ins you care about. Use them when you’re trying to find one specific check-in, check on a certain device, or focus only on anything that needs attention.
Search Bar
Use the Search bar in the All Check-ins section to quickly locate specific check-ins.
You can search by:
-
Check-in name
-
Device name
-
Device alias (nickname)
-
Device serial number
-
Creator name (who made the check-in)
Filters
Filters let you “show only” certain types of check-ins.
You can filter by:
-
Type
-
Scheduled check-ins
-
Self check-ins
-
-
Needs attention
-
Unanswered (someone hasn’t responded yet)
-
Overdue (someone responded late or the check-in is past due)
-
-
Include Closed
-
Turn this on if you want to see check-ins that are already Closed
-
Tip: Search and filters work together, so you can filter down first and then search (or vice versa).
3. Check-In Summary
The main Check-ins table shows each parent check-in schedule that can expand to show the most recent child check-ins.

Parent table columns
-
Type – Icon showing whether the check-in is Scheduled⏱️ or Self 🏔️.
-
Name – The check-in name.
-
Last – The most recent time the check-in was sent (your timezone).
-
Shows None until the first child is completed.
-
-
Next – The next scheduled check-in to be completed (your timezone).
-
May show None after the final scheduled check-in.
-
-
Creator – The user who created the check-in.
-
Status – Overall status of the check-in (examples may include):
-
None (hasn’t started yet)
-
Active (x) (running with x active devices)
-
Missed (x/x) (devices missed / active devices)
-
Escalated (x/x) (devices escalated / active devices)
-
Completed (x) (all devices checked in)
-
Parent row actions
If you hover over the right side of the table, you’ll see actions including:
-
Close – Close a check-in (confirmation required).
-
Edit – Edit the check-in settings.
-
Delete – Delete a check-in (confirmation required).
If you don't see these options see the Why can’t I edit this check-in? section at the end of this article.
4. Check-in Device Details
Click a parent check-in row to expand it. This opens the check-in Details, which includes:
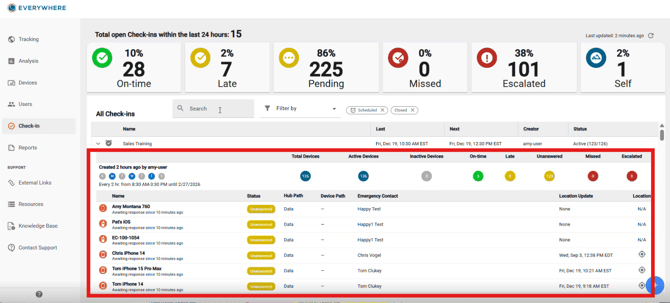
- A Child Check-in is a single occurrence within a parent schedule.
- Important: The dashboard only shows the most recent child check-in, not full history.
1) Check-in Schedule & Summary -
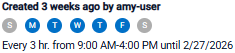
For scheduled check-ins, you’ll see a schedule summary such as:
-
Created time (e.g., “Created X time ago by …”)
-
Days of week for recurrence
-
Repeat window (start/end time)
-
End date (if one is set)

3) Child Device Status Table (showing most recent)
The table below shows the most recent child check-in for that parent.
![]()
Common columns and what they mean
-
Device – Device icon/type.


-
Name – Device name and identifiers (alias/serial/device ID).
-
Clicking the device name opens the device’s General page in a new tab.
-
- Status – Device-level result for the latest child:
-
-
Not Started – Request has not been sent yet.
-
Unanswered – No reply yet (not currently in missed/escalated).
-
OK – On-Time – Replied on time.
-
OK – Late – Replied late (during missed/escalate timeframe).
-
Missed – No reply and in the missed timeframe.
-
Escalated – No reply and in the escalated timeframe.
-
Inactive – Device is inactive and did not receive the request.
-
-
Hub Path – How the Hub sent the request (ex: data vs satellite; may show dual path depending on settings).
-
Device Path – How the device reply was sent (ex: data vs satellite).
-
Emergency Contact – Emergency contact name.
-
Clicking opens to the device’s Emergency Contacts page in a new tab.
-
-
Location Update – Last location update timestamp.
-
Location
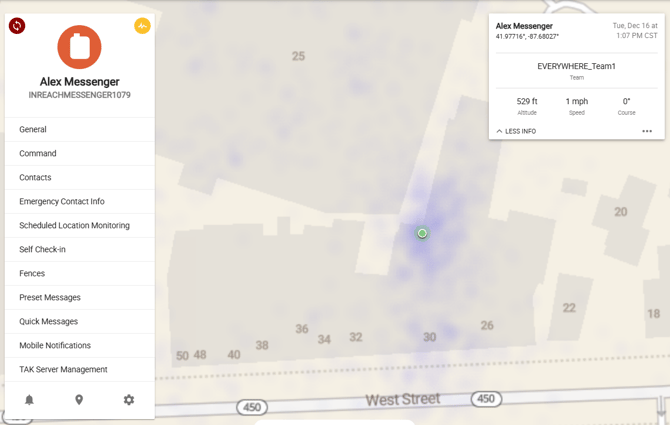
 – Location icon (if there is a last known location) or N/A.
-
Clicking the icon opens the Device Location page in a new tab.
-
Parent vs. Child Check-ins
- Parent Check-in: The overall schedule (e.g., “Valley Safety Check” every Monday at 8:30 AM).
- Child Check-in: Each individual occurrence (e.g., today’s 8:30 AM check-in).
Recommended Workflows
- Sort by Status to find escalated or unanswered devices fast.
- Compare Hub Path vs. Device Path to understand delivery and reply method.
- Click the location icon for situational awareness.
- Use emergency contact links for immediate outreach.
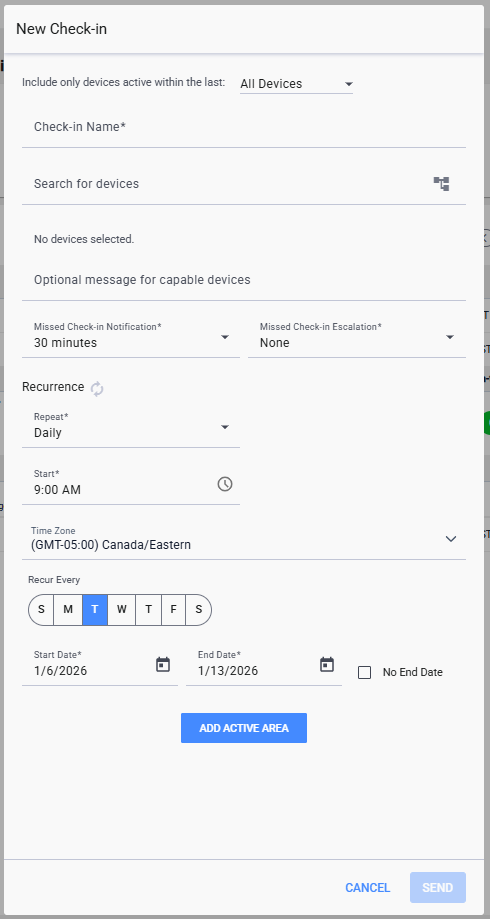
How to Add a New Check-in
- Click the blue + button
 in the bottom right of the dashboard.
 - Enter check-in name and team folder or individual device
- Note: You can create a check-in with no devices added OR create a check-in with an active area. Adding devices is not required.
- Optionally, type a message that will display if the check-in is received on the the physical inReach device & in the push notification for the check-in request within the app
- Set missed and escalated timeframes.
-
Schedule your check-in the Recurrence section
-
Choose how often it repeats: Daily, Hourly, or Every X minutes (15–60 minutes)
-
Set what time it starts and what time it ends
-
Pick which day(s) of the week it runs
-
Choose a start date
-
Choose an end date (or select No end date)
-
- If you would like to add an active area you can optionally upload a KML file or create a geofence yourself
- Click Send when you are complete.
- Once it runs, it generates a child check-in (the device-level results) that will appear when you expand the parent.
How to Edit an Existing Check-in
- Hover over the parent check-in.
- Click the pen icon to Edit to change schedule or settings.
- Note: Only the creator can edit or close a check-in.
FAQs
Why can’t I see older child check-ins?
The dashboard shows only the most recent child for each parent check-in. Older child runs aren’t available from this view.
Why did my check-in disappear unless I include “Closed”?
Check-ins close automatically when the last child in the series is created. To find them again, turn on the Include → Closed filter.
The page doesn’t fit on my screen—what should I do?
The dashboard is designed for a larger screen (commonly 1920×1080 minimum). If it looks cut off, check:
-
your screen resolution
-
your browser zoom level (type "Ctrl" & "-" to zoom out)
Why doesn’t refresh immediately change the numbers?
In some setups, the summary can be cached briefly. If the summary was updated within the past few minutes, a manual refresh may not immediately pull new data.
Why can’t I edit this check-in?
Common reasons include:
-
the check-in is Closed
-
it’s a Self check-in
-
you’re trying to edit a Start Date (not editable)
-
you’re trying to set the End Date in the past (not editable)
- you're trying to remove the Active Area. Active area cannot be removed when Editing a check-in.