
What Is a Pin Upload?
Pins (also called waypoints) are saved map locations that can be shared with devices in your organization. Instead of manually creating pins one at a time, the EVERYWHERE Hub allows you to upload multiple pins at once using a supported file.
The Hub currently supports:
- GPX files — commonly exported from Garmin devices and GPS applications
- CSV files — must use the official EVERYWHERE CSV Pin Upload template
Common use cases include:
- Hazards or restricted areas
- Work sites and inspection points
- Trail markers and navigation aids
- Emergency coordination locations
- Temporary operational checkpoints
Supported File Types
GPX Files
GPX files are standard GPS exchange files used by:
- Garmin handhelds
- Garmin inReach devices
- GIS and mapping software
- Other GPS tools and applications
Most standard GPX exports will upload without modification.
CSV Files
CSV uploads must use the EVERYWHERE CSV Pin Upload Template. Files with incorrect headers or unsupported columns may fail to import properly.
How to Access the Pin Upload Tool
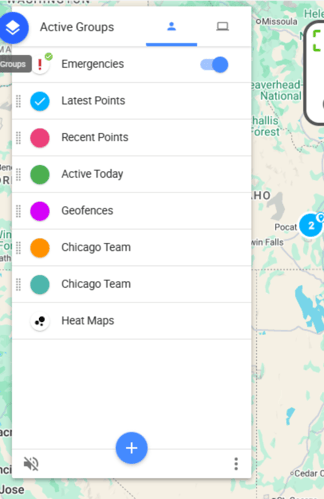
- Log in to the EVERYWHERE Hub.
- In the upper-left corner, locate the Active Groups panel.
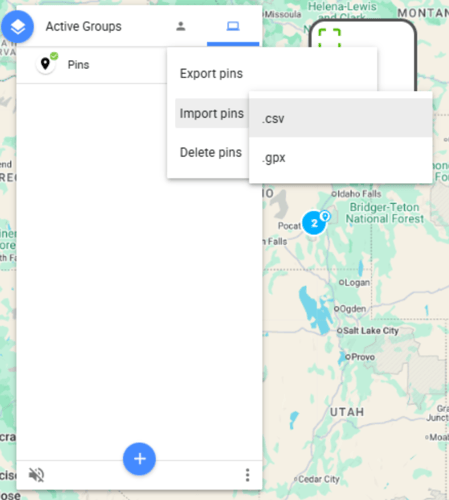
- Click the three-dot menu.
- Select Import Pins.
- Choose either:
.csv.gpx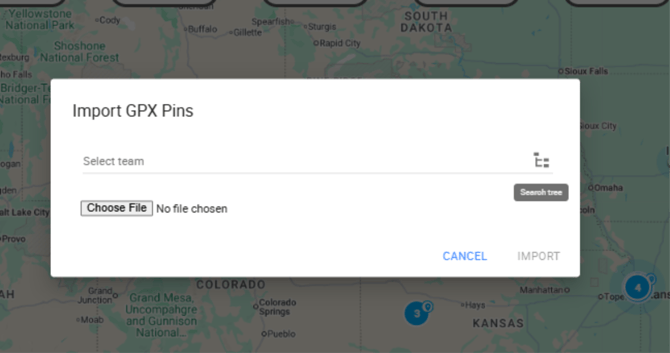
Uploading Pins to Devices
After selecting a file type, the Import Pins dialog will open.
To upload pins:
- Use the team tree to select the devices that should receive the pins.
- Optionally use the search bar to quickly locate a device by name.
- Click Choose File and select your GPX or CSV file.
- Click Import.
You can select an entire folder in the team tree to push pins to every device inside that folder at once.
Using the CSV Upload Template
When uploading via CSV, the file must follow the required EVERYWHERE formatting structure.
Required CSV Columns
| Column Name | Required | Description |
|---|---|---|
| Name | Yes | The pin label displayed on the map |
| text | No | Optional description or note |
| latitudeDegrees | Yes | Latitude in decimal degrees |
| longitudeDegrees | Yes | Longitude in decimal degrees |
| category | No | Optional category label |
| time | No | Optional timestamp |
Example Coordinate Format
- Latitude:
42.91489884 - Longitude:
-112.5768771
Important:
When saving the template:
- Save the file as a
.csv - Do not save it as an Excel workbook (
.xlsx) or the upload may fail
After upload, the pins are attached to the selected devices — but they will not appear on the map until your Display Group settings allow pins to be shown.
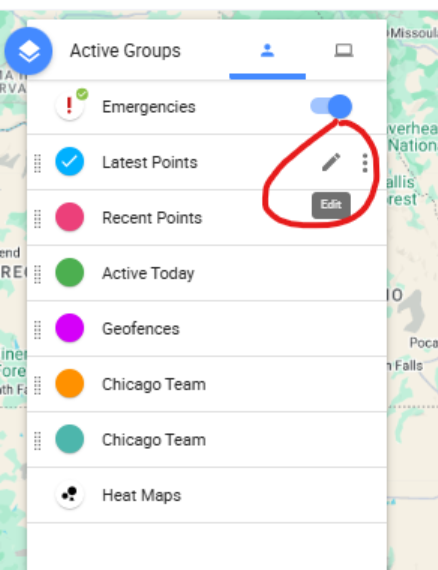
Verify the following:
- Open the Active Groups panel.
- Edit each active Display Group.
- Confirm:
- The devices receiving the pins are included in the Display Group
- The PINS toggle is enabled
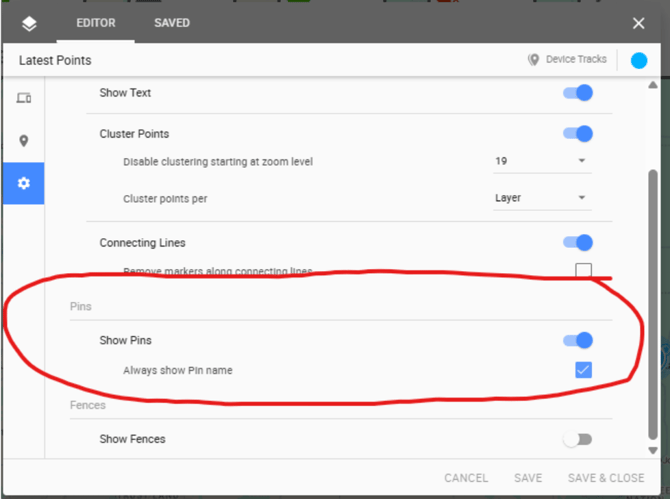
If either setting is disabled, the pins will exist in the system but will not appear on the map.